Saturday, August 23, 2008

Breeding Betta Fish Successfully


Breeding Betta Fish Successfully Getting That Prized Full Moon Tailed Betta Doesn't Happen OverBreeding Betta Fish Successfully Getting That Prized Full Moon Tailed Betta Doesn't Happen Overnight

By Troy Nantais

Breeding betta fish is something that many people have tried and even more have struggled with. However, learning to breed betas successfully does require that some work. It isn't like breeding guppies at all where you just simply put a few fish in a tank and start making babies. No breeding betta fish successfully requires proper knowledge of betta fish care, and in learning to apply tips that are crucial in order to get that next prizes full moon tailed betta. Here are a 3 quick tips that will help you on your next attempt at breeding betta fish

1.Don't use Store Bought Bettas. I know that this may sound weird because chances are the betta you have was bought at your local tropical fish store but there is a reason behind this tip. For one store bought betta fish are usually the wrong kind of fish. Most of the really beautiful bettas come from qualified breeders and the store bought ones in all likely hood are the wrong kind. The other reason is, store bought fish generally are not in the mood for breeding if you know what I mean. Store bought betas are usually older, less hearty and just not as inclined to have love affairs. So the solution when breeding betta fish buy them from a qualified betta breeder, it might cost you more, but you have a far greater chance of success.

2. Always Buy Breeding Betta Stock in Pairs. This is really an extension of point number one. Once you realize you need to stop using store bought fish in trying to breed betas don't chance out by buying only one. That kind of is self defeating of point number one.

3. Buy More then One Pair. This is the real secret to breeding betta fish. Betta fish are like people when it comes to love. Don't think that just because you thrust two betta fish on a blind date that your going to make the magic happen. It many cases your going to find perhaps the male just doesn't like the female you chose, or the male is interested but she is not in the mood. By buying more then one air of breeding stock you double your chances of making a love connection.

T Nantais has been an avid tropical fish hobbyist and started breeding betta fish when he was a kid. For more information about betta fish care and more tips on breeding betta fish successfully visit his site at http://www.squidoo.com/betta-fish-breeding

Article Source: http://EzineArticles.com/?expert=Troy_Nantais
http://EzineArticles.com/?Breeding-Betta-Fish-Successfully-Getting-That-Prized-Full-Moon-Tailed-Betta-Doesnt-Happen-Overnight&id=1189148


Wednesday, August 13, 2008

How To Set Up A Freshwater Fish Aquarium

STEP 1: Realize the responsibility involved.
Learning how to set up a fish tank is not all that difficult, but there are some steps you should follow. First, you must realize a few things about an aquarium setup. A tropical fish tank is just like having a dog or a cat when it comes to the amount of effort on your part. In order to have a successful freshwater tropical fish tank you will have to work at it. Once a week, or at most once every two weeks, you will need to perform some kind of maintenance on the tank. Most of the time you will be performing water changes. You will also have to feed your fish at least once a day. Setting up and running a fish tank does cost money. There are recurring expenses such as replacing filter media, buying food, etc. Check out the Freshwater vs. Saltwater Aquarium page to get an idea of the setup costs involved. If you are up to the challenge, please proceed!

STEP 2: Decide on an aquarium size.
It's a good idea to have in mind what kind of fish you want to keep before you purchase an aquarium. Some fish only grow to be an inch or two, whereas other types of tropical fish can grow 12 or 13 inches or more in length! Knowing what kind of fish you want will help you decide the size of the tank they will need. If this is your first time with an aquarium, it may be a good idea to start with a 10 or 20 gallon aquarium setup for now and stock it with some smaller and hardier species.

STEP 3: Decide on the aquarium's location.
Place your aquarium in an area where the light and temperature of the tank won't be affected by external sources such as windows and heater vents. Sunlight that enters the room through an unshaded window could affect the temperature of your tank. This could also lead to green algae problems for your tank down the road. You will want to place your aquarium on a stand that will be able to hold its total weight. You also want to be sure that the floor is able to support the total weight of the aquarium and stand. A good rule of thumb for determining the total weight of a full aquarium is 10 pounds per gallon of water. For example, a 55-gallon tank will weigh approximately 550 pounds when filled with water!

STEP 4: Buy your aquarium and equipment.
Now is a good time to decide on the type of aquarium filter you will want to use. You will also need to purchase a heater capable of heating the tank size you have. Buy the gravel, plants, a power strip and other decorations. A good rule of thumb for the amount of gravel that you will need is 1 to 1.5 pounds of gravel per gallon of water.

STEP 5: Set up your aquarium and stand.
Wash out your tank with water only! Do not use soap or detergents. Soap residue left behind will be harmful for your tropical fish. If you are going to use an under gravel filter (not recommended) now would be the time to set it up as well.

STEP 6: Wash Gravel, plants and decorations.
Be sure to wash the gravel thoroughly before adding it to your tank. An easy way to do this is to put some of the rocks in a pasta strainer and wash them out in your bath tub. Then place the clean gravel in a clean 5-gallon bucket for transport to the aquarium. After adding the gravel you can place your plants and decorations.

STEP 7: Add water to the aquarium.
To avoid messing up your gravel and plants, you can place a plate or saucer in the middle of your aquarium and direct the water flow onto the plate. Use room temperature water when filling. To remove the chlorine and chloramine, use something like Tetra AquaSafe for Aquariums. Don't completely fill up the aquarium until you are sure of the layout of your decorations. Otherwise, when you place your arm in to move stuff around water is going to spill over. Doh!

STEP 8: Set up equipment.
Install your heater but don't plug it in until the thermostat in the heater has adjusted to the water temperature. This usually takes about 15 minutes or so. Hook up your filter and any other equipment you have, then top off the aquarium water to just under the hood lip. Place your hood and tank light on the aquarium and then check your power cords to be sure that they are free of water. I would also recommend using a drip loop on all of the power cords to be extra cautious. For more information on safety, read this great article on aquarium electrical safety. Plug all of the equipment into a power strip and then "turn on" the aquarium.

STEP 9. Wait, wait, wait and then wait some more.
I know, you want to add some fish. But, in order to do this right you must wait until your aquarium has cycled before adding any fish. There are ways of speeding up this process. Check out the nitrogen cycle page to learn more about starting the nitrogen cycle and how to speed it up. If you must use fish to cycle, try to get a hardier species like the zebra danio or cherry barb. You may notice your fish tank cycle kicking in gear if you start to get some white cloudy aquarium water after a few days.

STEP 10. Add tropical fish.
Only add one or two fish at a time. Adding a couple fish at a time gives your filtration system the time needed to take on the increased biological load that the new fish introduce. When you bring the fish home let the bag float in the tank for about 15 minutes so that the fish can become acclimated to the temperature and pH of the aquarium water. After 5 minutes of floating the bag you should add some of the aquarium water to the bag so that the fish can become acclimated to the pH level in the aquarium. This will help reduce the amount of stress imposed on the fish. Stressed fish often leads to dead or diseased fish! Don't feed your fish on the first day. They probably wouldn't eat any food on the first day anyway. Let them get acquainted with their new home.

If you're interested in some good and hardy first fish, please read the Good First Tropical Fish article.

STEP 11. Get ready for regular maintenance.
Be prepared to spend some time once every week or two to clean your tank. Performing regular water changes will reduce the nitrate levels and keep your tropical fish happy and healthy.

As you can see, the steps for how to set up a fish tank are not that complex and hopefully you now have your aquarium setup and running! Have fun, take care of and enjoy your fish!

Monday, August 4, 2008

Bubble Nests

You may have noticed when looking at male bettas in the fish store that there is a cluster of tiny bubbles around the rim of their container. You may have even seen your own betta methodically blowing bubbles in your home aquarium. Well this isn’t because your betta is sick or bored. Your betta is doing what he does best. He’s preparing to care for his young.


Several betta species are bubble nest builders including the most common, Betta splendens species. In nature the males build the nest by clustering small bubbles on the surface of the water or under leafs or debris. When their nest is ready they coax a female underneath where they spawn. The females release the eggs, which are quickly collected by the males. The females do not participate in the protection of the eggs or the rearing of fry. Instead it is left entirely to the male who will closely guard the nest, warding off predators and collecting any eggs that may fall and returning them to the nest. After a few days the eggs hatch and the young fry continue to utilize the shelter of the bubble nest until they are ready to go on their own.

This nest building behavior is instinctual for male bettas and it is not necessary to have a female present to observe your betta building his nest. Most males will blow bubbles but the rate and size of the nest seems to depend on the individual male and possible other factors like age, health and water parameters.

Some males will frequently blow bubbles and you may find new nests on a weekly or even daily basis. Others may only blow a few nests a year. Healthy males tend to blow nests more often so if you see one consider it a good sign that your betta is happy and healthy. (A good sign doesn’t mean you shouldn’t continue to monitor your water parameters closely. Keep up with those water changes!) On the other hand, a lack of bubble nests doesn’t necessarily mean that your betta isn’t healthy. As mentioned earlier, bettas don’t all build nests frequently. The slightest current in your tank can discourage bubble nests too. Many betta keepers opt to cycle a tank and keep a filter running to create a more stable and healthy environment but may see less nesting due to the filter current. If this is your situation you could try to add some floating plants, float a styrofoam cup cut in half (to build a nest under) or try an adjustable flow filter. Bubble nests are great to observe but aren’t a necessity unless you are trying to breed bettas so don’t worry if you don’t see one.

As Murphy’s Law would have it, males love to surprise their humans with a nest right on the morning of their water change. Upon finding such a gift, most of us procrastinate on cleaning the tank for fear it will upset the betta. Of course, this isn’t very good for our fish’s health so here are two good tips.

1. It’s ok to destroy a bubble nest. He’ll get over it and will build you a new one. Clean water is much more important. Ignore the barking and furious fin wag. You’re bigger then he is.

2. Still devastated? Ok, you can scoop out the nest with a plastic cup or spoon and set it aside while you change the water and then ever so gently replace the bubbles back in the new tank.

If you’d like to read more on bubble nests check out a short Q&A on my blog entitled Bubble Nests & Bettas.

Aquarium Filter and Fish Tank Filtration

Your aquarium filter helps increase the quality of the water in your fish tank. Most folks think of mechanical filtration when it comes to aquarium filters but as you will soon see, there are some other filter types that you need to know about.

Mechanical, Biological & Chemical Filters

There are three types of filtration that every aquarium needs:

  1. Mechanical Filtration
  2. Biological Filtration
  3. Chemical Filtration

Mechanical Filtration
Mechanical filtration removes the free floating particles from the aquarium water. The siphoning action of a power filter that hangs on the back of an aquarium does a decent job of this type of filtration.

Biological Filtration
Biological filtration is the most important aquarium filtration type because it deals with the growing of the good bacteria in your filter. The good bacteria is the bacteria that converts ammonia to nitrite and then converts nitrite into nitrate. This establishment of bacteria is essential to your success with keeping tropical fish. For more information please read about the Nitrogen Cycle.

Ammonia -> Nitrite -> Nitrate

Chemical Filtration
Chemical filtration involves removing the dissolved wastes from the aquarium water. Often times this is accomplished through the use of activated carbon in the aquarium filter. Activated carbon can also help to reduce odors. Many people dislike using carbon in their tanks due to the fact that the carbon is useful for only a short period and then must be replaced. If it doesn't get replaced in a timely manner the very wastes that it removed can be released from the carbon back into the aquarium.

Zeolites can also be used in chemical filtration. Zeolite removes ammonia from your aquarium water and can be a fish life saver if you have high ammonia levels. Many first time fishkeepers mistakenly add too many fish to a new aquarium before it has cycled and experience the disappointing loss of their fish. Using zeolite during the cycling process in your aquarium filter can help prevent this from happening but it has the side effect of lengthening the time it takes to complete the aquarium nitrogen cycle.

Types of Aquarium Filters
Corner Filter
The corner filter sits inside the aquarium in one of the corners or even sticks on to the glass. It is very low-tech but a corner aquarium filter can be used successfully for mechanical, chemical and biological filtration. The key is not to change out the entire filter material when performing maintenance. Only change out the carbon and part of the filter material. Corner filters require frequent maintenance.

Undergravel Filter (UGF)
Undergravel filters are commonly found with beginner's aquarium kits and the undergravel filter has been around for a long time. Undergravel aquarium filters can provide good mechanical filtration because it forces the water down through the aquarium gravel where particles are trapped.

Biological filtration occurs in the gravel because of the slow flow of water through it. The water is then pushed up through the uplift tubes in the back of the tank where chemical filtration takes place with the activated carbon in the top of the tubes.

The problem with this type of aquarium filter stems from the fact that it can be difficult to thoroughly vacuum the gravel and harmful gas pockets can form under the gravel plates thereby harming your tropical fish. I personally don't use undergravel filters because of this reason. There's a lot of controversy surrounding the use of undergravel filtration. Check out The Undergravel Filter Controversy for more on the this subject. Many long time fishkeepers still use the undergravel filter and swear by it. If you do use an undergravel filter try to regularly vacuum your gravel to prevent the harmful gasses from forming.

Sponge Filter
Sponge Filter Sponge filters can provide a cheap and effective form of biological filtration. Water flows through the airlift tube allowing a colony of beneficial bacteria to grow in the sponge. There is no chemical filtration with this method and the mechanical filtration is very weak. You must do frequent water changes if this is your only form of filtration. Many breeders use the sponge filter in conjunction with a bare bottom tank. After feeding their young fish they will siphon any remaining food to prevent the water quality from detiorating. Frequent water changes are performed because it aids in the rapid growth of the young fish. Fish breeders don't have to worry about mechanical or chemical filtration as much because they are performing frequent water changes.

Power Filter
The power filter is probably the most popular filter type for a variety of reasons. They are easy to use and clean and they can be an effective means of mechanical, chemical and biological filtration! The drawback to using power filters is that it is very inefficient because of its design. The intake tube for the dirty aquarium water is directly below the lip of the outflowing filtered water. Does this make any sense? Not to me either.

More aquarium kits come with a power filter than any other type of aquarium filter. Try to get a power filter that contains two filter media slots. With two filter slots you can change out one side of the filter and then a few weeks later change out the other side. If you change out the entire set of media cartridges at once you run the risk of having to re-cycle or mini-cycle because you've tossed out much of the beneficial bacteria.

Canister Filter
Canister filters are on the higher end of the price scale but they are pricey for a reason. They work. Often there are multiple trays for a canister filter with each tray providing a type of filtration. The first tray could be a sponge that filters (mechanical and biological) the large particles. The second tray could be filled with zeolite that removes ammonia from the water (chemical). The third tray could be activated carbon which would further filter (chemical) the water. Most canister filters push the water from the bottom of the canister to the top but some work just the opposite. Find out which way yours works to get the most out of the canister filter. This is our personal choice of aquarium filter on most of our tanks.

Protein Skimmer
Protein skimmer models come in a few different styles. There are those made for in tank use (Visi Jet PS), protein skimmers that hang on the back of the tank and those designed for use in a sump.

Those desiged for in tank use are usually less desirable because they don't seem to work as well as the other types. Try to get one that hangs on the back of the tank such as the AquaC Remora Protein Skimmer or one for your sump. Also, make sure that you can easily get to and remove the collection cup for daily or weekly cleaning.

This piece of equipment is usually very pricey but it is a critical piece of equipment for saltwater aquarium beginners nonetheless. They are virtually useless in freshwater tanks.

In saltwater tanks, the skimmer will remove dissolved organic material from the water and anyone who has used one can tell you about the smelly brown gunk that gets pulled from the water. In the past, saltwater aquarium keepers would sometimes experience a complete die off of the fish in their tanks. Many believe that it was due to the amount of dissolved organics in the water and by using a protein skimmer they have drastically reduced the chances of this happening.

Since this is an expensive piece of equipment you will want to shop around and research the various models out there. It's been our experience that you usually get what you pay for when it comes to skimmers.

Powerhead
Powerheads are used for water movement as well as in conjunction with an undergravel filter system. If you're running a system where air stones drive the water flow in your undergravel filter, consider using a powerhead in one of the uplift tubes. The powerhead should help generate much better flow through the UGF, resulting in a more efficient UGF. Many come with a tube that is connected to the powerhead that hangs on the outside of the tank with an air flow valve. This allows you to mix air with the water being pushed out of the powerhead. That can help increase surface agitation and aeration in your tank.

Saltwater hobbyists frequently use multiple powerheads situated in a way that allows them to control the flow of the water in the tank. Saltwater tanks usually require more water movement than freshwater tanks. Constant water movement prevents dead zones in a tank and keeps uneaten food suspended in the water column so that the fish can eat it or the mechanical filtration can get rid of it.

Refugium
A refugium is an external tank, usually smaller, that is used to house smaller fish and invertebrates for cultivation and/or feeding the fish in the display tank. It can be connected to the main tank and is sometimes apart of or separate from the sump. You can even get a hang on the back of the tank type refugiums or retro a power filter to use as a refugium. See the refugium setup for more information. A refugium provides isolation for those more delicate specimens that can easily and quickly become food for the larger fish in the display tank.

Aquarium Sump
A sump is also an external tank but one that has water lines connected to the display tank. They can be any size but are often smaller and placed hidden below the main tank in the cabinetry. Sumps can provide many benefits for you. They can help with nutrient export by allowing certain algae types to grow uninterrupted from grazing by your herbivores in the display tank. Sumps also increase the total amount of water in the system. For instance, if your aquarium is 55 gallons and your sump is 20 gallons, you essentially have a 75 gallon tank.

This extra tank also gives you the ability to hide ugly equipment (like filters and protein skimmers) that could diminish the look of the display tank. Many saltwater hobbyists add any saltwater supplements to the sump instead of the main tank. Supplements such as Iodine, strontium, kalkwasser (lime water) dosing systems and others are often placed into or connected to the sump. Is a sump absolutely necessary for a saltwater aquarium? No, they are not mandatory but they can definitely help in keeping your system (water parameters) stable.


Breeding The Betta

The Bubble Nest Builders

When getting started with breeding the Betta, both male and female that are around the same size must be chosen. They should be fed well, usually with live foods and kept in 5 inch clean water with a temperature of 80 F. Plastic plants and decorations, such as plant pots, are advised to be placed in the aquarium for the female to hide when necessary. They must be separated at first but allowed to see each other through a separation. Generally, either a tank separator can be used to keep them separate or a hurricane globe can be inserted into the tank with the female inside it.

Interest should be shown for one another and thereafter the male will start building a nest. These bettas nests are created when the male draws in air from the surface and envelopes it in a film of saliva. When the he releases it, it floats to the surface. Some leaves, a piece of styrofoam cup, a plastic lid or something similar should be put to float on the water surface or taped to the side of the tank. As he releases the bubbles they will be trapped underneath the item. As this process repeatedly done, the nest is slowly created.

When the nest is done, the female should then be released from the hurricane globe/seperation and spawning should follow. Sometimes it may not be right away and can take up to 5 days before they start. If too much aggression is shown towards the female they should be separated again. However, sparring often takes place. If all is well and she is ready, he will lead her to a spot under the nest and "embrace" her, the eggs are then released. The female may look weak and lay motionless, but she will recover. When the spawning is complete the female will look for a place to hide. At this point in time she is to be taken out of the tank or else the male can kill her. The male will then pick up the eggs and 'blow' them into the nest and thereafter he will guard them until they hatch.

The Mouth Brooders

Mouth-brooding bettas come from waters where the surface is not still, like streams, making it impossible to build a nest.

To breed them, clear clean water and substrate ranging from mud to gravel is needed (depending on the Betta species). Dense vegetation should be planted into the aquarium. Their water temperature should be cool, say between 65 and 75 degrees F. Flowing streams coming from the highlands have cooler water.

At 80 degrees Fahrenheit and above the fish will be visibly stressed. To tell the difference between male and female, as in most Bettas, the female has a smaller head, she is duller in color and smaller in body size. They should be fed bloodworms, frozen daphina and most meaty foods.

Like the bubble nest building bettas, the male and female fish should be separated, for a week at the least. Occasionally a pair of mouth brooding bettas may 'dance' and the female having her fins flared out may dance around the male to attract his attention during the courtship. With the mouth brooding Betta species, it is the female who starts the spawning.

Spawning will generally take place inside a plant pot, with the same procedure of most anabantids, the male "embracing" the female. After spawning the male will gather the eggs in his mouth or the female may pick the eggs up into her mouth and spit them to him. The process can take up to quite a few hours. Unlike the bubble-nest-building Bettas, the female guards the area which the male takes to brood. Most males will then brood the eggs for between 7 to 10 days. Some males hang near the water surface others take to "caves" to brood. He may not eat all the while he holds the eggs in his mouth, although it is believed that some may take a tiny bit at a time. The male will get thin, looking as if he is feeling very low and will look as if he has trouble breathing through out the brooding process. Also, his coloration will get darker, mainly in the head area. Care should be taken at this time, as the male betta will eat the eggs if he is disturbed often.

Mahachai Betta Fry Mahachai Betta Fry
Photo Credit: COBettaCouple

Hatching the Betta Eggs and Fry

For the eggs to hatch, a tight well fitted lid, glass or plastic wrap should be used to cover the tank so no cooler air is able to get to the water surface. The fry's labyrinths start developing when they are around 6 weeks old. If during this time when coming to the water surface for air they are exposed to cooler air they can get pneumonia and die.

Feeding can start two days after hatching with bubble nest building betta fry using micro food. After two weeks and around every 4 hours the fry must be fed live baby brine shrimp or micro worms, a bit at a time. Thirty six hours after spawning, you will notice the tiny fry falling out of the nest dropping to the bottom, the male will retrieve them straight away and blow them back into the nest. When the fry become free swimming horizontal it is best to remove the male as he might start taking them for snacks. But, if he starts eating the fry earlier it is possible to remove him then. The fry will fall to the bottom and remain there until they become free swimming.

For the mouth brooders, it is recommended that the male is taken out of the tank straight after he spits out the fry. Baby brine shrimp or micro worms can be fed to the fry immediately after the male spits them out. Thereafter as they grow, follow up with grind worms, flake foods and quickly pellets.

It is essential to keep the water clean when you are raising the fry. A very small plastic tubing attached to air tubing or a turkey baster can be used to suck up the debris at the tank bottom.

Sunday, July 27, 2008

Siamese fighting fish

Betta (Siamese fighting fish)
A blue veiltail male.
Female
Female
Scientific classificatio

The Betta fish (Betta splendens), commonly called a "siamese fighting fish", is one of the most popular species of freshwater aquarium fish. It is native to the Mekong river basin in Southeast Asia and called pla-kad or pla-kat ("Biting Fish") in its native Thailand.

The name Betta (or betta) is pronounced /ˈbɛtə/.[1] That is, the first part is the same as the English word bet. By confusion with the name of the Greek letter beta, the name is often pronounced /ˈbeɪtə/ in American English, and may be misspelled with one t. The name of the genus is unrelated to that of the Greek letter, being derived from ikan bettah, in a local language in Thailand.[2]

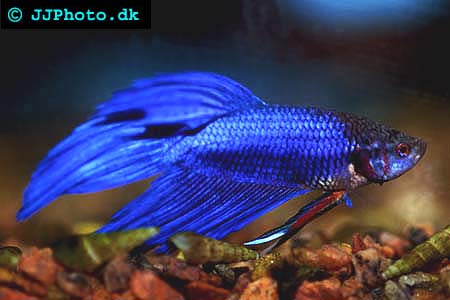
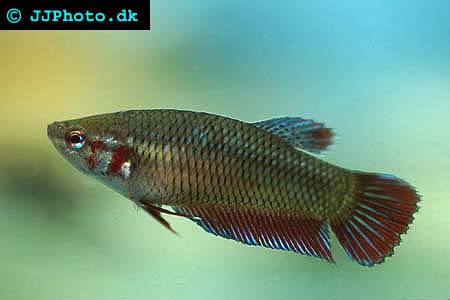
B. splendens usually grow to an overall length of about 6.0 cm (~ 2.3 in), though some varieties reach 8.0 cm (3.5 in.) in length. In recent years breeders have been able to create "Giant Bettas" that exceed 8.0 cm (3.5 in.) due to the manipulation of a mutant gene. Although bettas are known for their brilliant colors and large, flowing fins, the natural coloration of B. splendens is a dull green and brown, and the fins of wild specimens are relatively short. However, brilliantly colored and longer finned varieties, such as veiltail, delta, superdelta, and halfmoon have been developed through selective breeding.

The betta is a member of the Gourami family (family Osphronemidae) of order Perciformes, but was formerly classified among the Anabantidae. Although there are nearly 50 other types of bettas, B. splendens is the most popular species among aquarium hobbyists, particularly in the United States.

Rreathing

Like anabantids and all members of the genus Betta, Siamese fighting fish have a labyrinth organ in their heads that allows them to take oxygen directly from the atmosphere in addition to the oxygen taken from water via their gills. Bettas that cannot reach the surface may drown.

Diet

Bettas have upturned mouths and are primarily carnivorous surface feeders. In the wild, bettas feed on zooplankton and the larvae of mosquitoes and other insects, such as flies, crickets, or grasshoppers.[citation needed] Bettas which feed on wide range of foods live longer, have richer colors, and heal fin damage more quickly. Typically, Betta pellets are a combination of mashed shrimp meal, fish meal, brine shrimp, bloodworms, and vitamins. Bettas also will eat live or frozen bloodworms, brine shrimp or daphnia. For variety and fiber, bettas are fed finely-chopped, high-protein vegetables, such as soybeans, green beans, broccoli, corn, and carrots. Some bettas subsist on dried flaked food suitable for tropical fish, because although this feed reduces their coloring, the bettas are able to digest this better than pellets. However, just feeding bettas vegetables alone is not a good idea since they are carnivorous and do best with meat products. Bettas can get constipated when their diet lacks variety. If their stomach looks swollen, feed them food with fiber.

Reproduction and nests

Females have an ovipositor, a small, white 'pearl' at the anus, most visible from below the fish. After mating, females lay egg clutches of approximately 100-500 eggs, rarely over 600 eggs.[citation needed] The female is generally removed from the breeding tank immediately after spawning, as they are known to eat their own fry.

Betta males build bubble nests of various sizes and thicknesses at the surface of the water. During and after spawning, the male uses his mouth to retrieve sinking eggs and deposit them in the bubble nest. After approximately two days the eggs hatch, and after three more they become free-swimming fry; at this point the male is generally removed from the breeding tank to prevent cannibalism and stress to the young. Betta fry are fed infusoria for the first several days, followed by newly hatched brine shrimp or similarly sized food.[3]
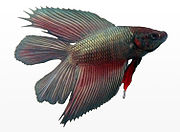

B. splendens can be hybridized with B. imbellis, and B. smaragdina.

Colors

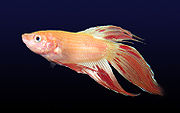
A so-called "orange dalmatian" male.

Bettas have been affectionately nicknamed "The Jewel of the Orient" due to the wide range of colors which are produced through selective breeding.

Wild bettas only exhibit strong colors when agitated.[citation needed] However, breeders have been able to make this coloration permanent, and a wide variety of hues breed true. Bettas come in a variety of colors, such as red, blue, turquoise, orange, yellow, white, and green. Most are slightly iridescent, and can appear to change color with different lighting or viewing angle. Breeders have also developed different color patterns such as marble and butterfly, as well as metallic shades such as copper, gold, and opaque.[citation needed]

Breeders around the world continue to develop new varieties. Often, the male species are sold preferentially in stores because of their beauty, compared to the females. Recently, breeders have developed in females the same range of colors previously only bred in males. However, females never develop finnage as showy as males of the same type and are almost always more subdued in colouration.

The gene that makes black bettas is the same one that creates cancer. Therefore, black bettas almost always die earlier than other bettas.

Tail shapes

A metallic, double-tail male Betta

Breeders have developed several different tail shapes:

  • Veiltail (non-symmetrical tail, only two rays)
  • Crowntail (highly frilled, extended spiny rays)
  • Combtail (less extended version of the crown tail)
  • Half-moon (large tail fin that forms a 180-degree, or larger, half circle)
  • Short-finned fighting style (sometimes called "plakat")
  • Double-tail (the tail fin is split into two lobes and the dorsal fin is significantly elongated)
  • Delta tail (tail span is less than half-moon with sharp edges)
  • Fantail (a rounded delta tail)

Behavior

A male "attacking" and flaring at his reflection in a mirror.

Male and female Bettas flare or "puff out" their gill covers (opercula) in order to appear more impressive, either to intimidate other rivals or as an act of courtship. Females and males will display horizontal bars (unless they are too light a colour for this to show) if stressed or frightened. Females often flare their gills at other females, especially when setting up a pecking order. Flirting fish behave similarly, with vertical instead of horizontal stripes indicating a willingness and readiness to breed. Bettas sometimes require a place to hide, even in the absence of threats. Bettas may set up a territory centered on a plant or rocky alcove, sometimes becoming highly possessive of it and aggressive toward trespassing rivals.

On average, males are more aggressive, though individual females, especially crowntails, demonstrate a wide range in level of aggression. The aggression of bettas has been studied by ethologists and comparative psychologists[4]. Bettas will even respond aggressively to their own reflections in a mirror; use of a mirror avoids the risk of physical damage inherent in actual conflict.[citation needed]

Tankmates

Because of the aggressive nature of the Betta splendens species, tank-mates must be carefully chosen:

Two or more Males: Contrary to popular belief, male betta splendens do not fight to the death in the wild; when one fish has won the fight, the loser retreats to safety.[citation needed] In an aquarium, however, there is no retreat, so the victor fish continues attacking the loser, often resulting in the loser's death, therefore, hobbyists rarely house two male B. splendens in the same tank unless they are (a) separated by a partition, or (b) they are from the same batch of eggs and are immature.

A Male and a Female: In the wild, females stay clear of males, except during mating. When cohabiting in tanks, males might kill females, and are generally kept apart unless (a) they are juvenile siblings, (b) they are breeding, (c) there is a partition, or (d) the tank is large enough for the female to escape attack. Often, before breeding, breeders use a partitioned container to allow female display without risking harm by the male.

Several female bettas in a community tank with mollies and rainbowfish.

Two or more Females: Bettas are not schooling fish, but in a large tank with many hiding spaces, female bettas can cohabit. When two females share a tank, one usually bullies the other; however, four or more females will establish a hierarchy allowing peaceful co-existence. Nevertheless, females living in community must be monitored for aggressive females.

Compatible fish of other species: Hobbyists put betta splendens in tanks with other species after careful research and preparation. Common tankmates include platies (moons), corydoras catfish, and loaches. Females can share a tank with danios, tetras, barbs, and gouramis. Shrimp are popular tank-mates because, provided with sufficient natural plant cover, they keep the tank clean without causing stress to the bettas.[citation needed]

The success of a betta in a community aquarium, however, is largely dependent on the particular betta's level of aggressiveness. Whereas some bettas make wonderful community fish, particularly belligerent or skittish bettas are best housed alone.

Incompatible fish of other species:

  • Very small fish (smaller than one inch) may be eaten.
  • Fish with long, flowing fins may trigger aggression.
  • Slow-swimming fish, e.g. fancy guppies, will be unable to escape bullying.
  • Mollies tend to bite the fins off and have been known to kill bettas.
  • Schooling fish, especially barbs and certain tetras, will nip at a betta's fins.
  • Aggressive fish, such as piranhas, and bluegills, will bully or (if large enough) eat bettas.
  • Fish belonging to the same biological family as the betta, such as Paradise Fish and gouramis, may attack or be attacked due to their relatively similar appearance and cross species aggression.
  • Goldfish are unsuitable tank-mates because of their great appetites, preference for cold water, and high excretion-rate. Like many tropical fish, Betta splendens might harass and kill small, slow fancy goldfish; in return, goldfish have been known to bite a Betta's tail. Goldfish also can be suitable with bettas. It depends on the level of agression of the betta.

Living conditions

Bettas are often kept in extremely small containers, a practice which many aquarists consider inhumane. This practice is due in part to practical considerations; few pet stores have the space or finances to display a large selection of male bettas except in small containers. However, many inexperienced fishkeepers continue to house bettas in small containers after purchase. A popular misconception is that wild bettas live in very small puddles, and thus are "happier" when kept in cramped conditions. In reality, like any other fish, bettas are healthier, more active and will often grow larger when they are kept in a roomy tank. Aquarists typically recommend that there be at least 1 gallon (3.75L) of water for each cubic inch (16.5cm³) of fish (this is a general estimate; some species may require additional space).

The betta deserves its reputation as a hardy, low-maintenance breed and a good choice for beginning aquarists. However, betta still require appropriate conditions to survive and thrive. The betta is a tropical fish and does best when kept in a tank with a heater (use of heaters is strongly discouraged in tanks under 5 gallons (20L) in size). The ideal temperature for a betta is 78-80°F. Temperatures lower than 76°F (25°C) render the fish lethargic and illness-prone. Betta are capable of jumping from tanks and thus must be kept in a tank with a cover; this cover must not be air-tight, however, as the betta needs to be able to breathe from the surface (especially in a tank which lacks aeration). Also it is recommended by breeders and pet stores alike is that if you are unaware of your water's pH, to use spring water instead. This can be found at virtually any store, or a local spring would be just fine. This helps prevent your betta from getting sick or dying from unbalanced water conditions.

Many beginner's mistakes are perpetuated by the betta's hardiness. Along with believing that cramped spaces are good for bettas, new owners often believe bettas can live for extended periods in foul water, or that a betta doesn't require water changes. Bettas in 1 gallon tanks require 2-3 water changes a week. Bettas in 2 or 3 gallon tanks can make it with weekly water changes and maintain good health for many years. Although small tanks are often sold with filters, tanks with less than 5 gallons do not cycle and bettas still require regular water changes to prevent amonia buildup.

Bettas enjoy plastic plants and small ornaments they can rest on. Many bettas also like ornaments with small openings they can swim in and out of. However, especially with veiltails, plants and ornaments need to be free of sharp edges to prevent the betta from tearing its fins. Because of frequent water changes, most betta owners do not use aquarium gravel in their tanks and bowls. Glass pebbles and marbles designed for aquariums are often popular substitutes.

Friday, July 25, 2008

Betta Breeding

Bettas are bubble-nest breeders and are frequently bred in aquarium. If you wish to try breeding Betta you will have to start by obtaining a pair. The best method is usually to get at least two female Betta and two males. It is important that you select healthy looking fish with good external features. By preparing at least four Bettas and getting them into breeding condition you will have replacements if a couple turns out to be incompatible, or if any Betta turn our to be unhealthy or incapable of breeding. To get your Bettas into breeding condition should keep them in a suitable environment and follow all the general guidelines for keeping Bettas, such as ideal water temperatures, suitable pH levels etcetera. Feed the potential parents live or frozen meaty foods twice a day or more.

Start off by keeping all four individual Bettas isolated, but still able of noticing each other during 3-4 days. You can also use another method where you isolate the fish completely from other Bettas during four days. Somehow isolation seems to trigger spawning in Bettas, but we still do not know why.

A 2.5-10 gallon aquarium is large enough to function as a breeding aquarium for Bettas, as long as the water can be 5 inches deep. Decorate the aquarium with floating aquatic plants, and also insert a few clay pots as hiding places. The water temperature should be kept constant between 80 and 82 degrees F. A cover is usually necessary to keep the water and air at a constant temperature, and if the room is subjected to draft a cover is absolutely necessary since any draft can cause water movements that will disturb the Gourami bubble-nest.

male betta picture
A blue male Betta. Copyright www.jjphoto.dk
Most Betta breeders choose to add the male Betta to the breeding aquarium a few hours before the female Betta is introduced. This way, the male will get some time to explore the breeding aquarium and establish his territory. When you have placed the female Betta in the breeding aquarium you will usually have to wait no more than a few hours before you can watch the male Betta build a beautiful bubble-nest. The female Betta will display dark vertical bars on her body, and this is a sign that shows that she is ready to spawn. Even if the Betta pair is highly compatible and ready to spawn, they will fight each other in the breeding aquarium. The two will even try to tear up each others fins, and this might look scary but actually makes sense from an evolutionary perspective. By fighting each other, both sexes prove that they are strong individuals that will pass on good DNA to the new generation. A Betta does not want to waste time and energy by breeding with an unhealthy fish with genetic defects.

If your Betta pair still haven’t spawn within tree days after the female Betta was placed in the breeding aquarium, the pair is not compatible and will not breed. Take away the female Betta and insert your other female Betta to the breeding aquarium. If the male Betta never got started on his bubble-nest building, it is probably something wrong with him and you should remove him from the breeding aquarium instead and insert the other male. You can also remove both fishes and give the other pair a try.


female betta picture
A female Betta. Copyright www.jjphoto.dk
Hopefully, one of the possible combinations will prove successful, and eggs will be deposited, fertilized and placed in the bubble-nest. As soon as this has happened, you should remove the female Betta from the breeding aquarium. She will most likely be suffering from wounds from the courting period, and should therefore be placed in a medicated container. The male should be left to care for the offspring, and not be removed until the fry is free swimming. It is a good idea to place him in a medicated container as well. Newly hatched Betta fry will get enough nutrition from their yolk sacs and should not be fed during the first day. When the yolk sacs have been consumed, instinct will draw the fry towards moving objects in the aquarium. In the wild, Betta fry eat micro organism and your Betta fry should therefore ideally be fed vinegar eels or similar. Vinegar eels are microscopic nematodes and small enough for young Betta fry to consume. When the Betta fry are a few days old, you can start feeding them newly hatched brine shrimp. Small daphnia, grindle worms and other types of micro-worms are also suitable.